12 June 2014
The Australian ABC, maker of new "arts" program called The Mix, is saying "this program will be wide in appeal covering art, television, movies, books, games, apps, music, festivals, gigs, events, celebrities, theatre and even circus."
My comment:
How about focusing on real ART.
Music already has plenty of attention from radio stations. Movies and performance have dedicated theatres where people can see them, and plenty of attention from the media already... cheap programming.
But real art.. wherefore art thou? Arts programs VERY RARELY show a dab of paint, or a chisel of wood.
There are thousands of artists in each state, and we deserve a visual medium (TV) that is devoted to our practice: painting, printmaking, sculpture, multi media and hand crafts.
And not just talking heads either! Show the actual making of art: the tactile touch, the messy splash, the production process.
Show new colours, new acrylic mediums, brush cleaners, printing presses, ipad drawing apps.
Real Art is successfully shown already: Youtube art movies are normally homemade and have tens of thousands of viewings. Just google "watercolor lessons" and you'll see hundreds of videos.
Also, check out the "Colour in Your Life" Australian TV show. (I happen to be appearing on this show this week!) Graeme Stevenson goes into studios and shows artists working on a project. His show is fantastic: the ABC could learn from this series, and produce an international version, with it's bigger budget.
Music and film is cheap and pretty. You can fill an hour easily with an orchestral concert. But let's not, eh? It's already been done... time for a show about real art.
PISSARRO: How to paint like an Impressionist
"Look for the kind of nature that suits your temperament. The motif should be observed more for shape and colour than for drawing ... Precise drawing is dry and hampers the impression of the whole ... it is the brushstroke of the right value and colour which should produce the drawings ... Don't work bit by bit, but paint everything at once by placing tones everywhere, with brushstrokes of the right colour and value, while noticing what is alongside. Use small brushstrokes and try to put down your perceptions immediately ... Cover the canvas at the first go and then work until you see nothing more to add. Observe, the aerial perspective well, from foreground to the horizon, the reflections of sky, of foliage. Don't be afraid of putting on colour, refine the work little by little. Don't proceed according to rules and principles, but paint what you observe and feel. Paint generously and unhesitatingly, for it is best not to lose the first impression. Don't be timid in the presence of nature; one must be bold at the risk of being deceived and making mistakes. One must have only one teacher - nature; she is the one always to be consulted."
Unpublished private notes of the painter Louis Le Bail, who received Pissarro's advice during the years 1896-97, quoted in John Rewald, "The History of Impressionism" revised and enlarged edition, New York: Museum of Modern Art, 1961, pp. 456, 458, note 30.
"Toulouse-Lautrec Paris and the Moulin Rouge" by Jane Kinsman, National Gallery of Australia.
Sorting Photos on iPad
A friend who has just been given an iPad had a simple question:
How do I move my photos into folders?
Answer:
A. "Photo+Folder" app. (just a few bucks to buy.) Does a good job. Does not have 'drag and drop' though, so is a bit clunky.
B. Do it on your computer first.
1. Make a folder on your PC or Mac computer and call it Main Folder
2. Inside this folder, make new sub-folders and name each one like an album.
for example:
Flowers to Paint
Portraits of Friends
3. Now find your photos and cut/paste or drag them into each sub-folder.
4. Connect your iPad to your computer and fire up iTunes
5. Click on your iPad's name under "Devices" (on left).
6. Now select "Photos" in the iTunes window.
7. Tick the box at the top of the window that says
"Sync Photos from..." and then click open that little panel beside it.
8. Select "Choose folder..."
9. Hunt back though your computer until you find your "Main Folder", and select it.
10. Click "Apply" at the bottom, and wait.
Your pictures will be transferred onto your iPad, inside their folders. These will appear under "Albums".
Hope this helps.
Thanks to psabrille840 from apple-ipad-tablet-help.blogspot.com for the original post that answered this question.
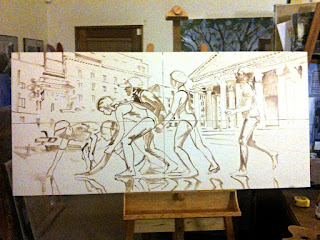
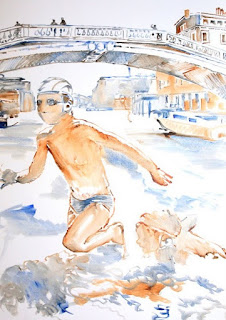
Technique: My journey from sketch to large oil painting.

Another progress pic. My hardest challenge at this stage is to not over work it. I need to leave some raw canvas and some underlying sketchiness.
This is my under-painting. I will now start to paint over it with more accurate colour, and more background detail.
Using just two colours: French Ultramarine and Burnt Sienna, I roughly painted the figures, looking for tonal definitions.
I sketched my image onto my newly stretched linen canvas using thinned out burnt sienna.
The rights and wrongs of managing one's palette.
(Image from wikipedia)
Paint build-up on palettes (as seen in the photo above) is a bad habit. You end up with half-dry, scabby paint that is lumpy and difficult to manipulate. It is also wasteful, as the dry paint cannot be re-used.
I was taught by Jon Falkenmire to always clean the palette at the end of the day. Below is my palette, and Jon's. I scrape off the paint, and rub the palette with odourless solvent.
(Hint: Rather than waste paint, I use a palette knife to lift off the paint and wipe it onto the edge of a businesss card. This card then goes into a jar that is full of water. The oil paint will stay fresh for a few days, ready to be put back onto the dry palette the next time.)
Over time a lovely neutral patina develops on the palette, and it enables me to be more accurate with gauging tonal values.
Above: My palette
Above: Jon's palette with brushes
Ideal colour layout:
When putting the paint onto the palette, start with a large white on the right hand side, followed by these colours: yellows, reds, crimsons, browns, blues working anti clockwise from the white.
Above: This brand new palette shows the artist is using the traditional colour layout.
My palette ready to work: As I am painting only these apples as a "daily painting" I have squeezed out a limited selection of colours, but still white on the right, with yellows, blues and browns set out in a circle. Following a routine makes for faster painting, with more control over the colours, and less likely that you'll end up in a mess.
-------------------------------------------------------------------------------------------------------
Colour Trickery: This demonstration is shamelessly lifted from:
http://www.mcwade.com/DesignTalk/
Look at the two shades of green A and B.
Which one do you think is the darker?
B is slightly darker than A.
Surprised? Its true. Here I cut and pasted the two swatches. (Its all due to relativity... and the eye playing tricks. Click on the image to go to the original web site.)
Projector
" the program will be wide in appeal covering art, television, movies, books, games, apps, music, festivals, gigs, events, celebrities, theatre and even circus."
First, I create my composition as a sketch, and then scan it into a computer.
I make many changes using photoshop. I move the elements, and play with colour choices.
When I am satisfied with the image, I project the work onto a canvas. In this case, I used a thin oil wash to sketch in the image. Then I paint over the wash, making changes as I go.
Grid
Alternatively I will print out my composite picture onto paper, fold it in half, then quarters, then eighths and so on. Correspondingly I draw a grid onto my canvas, and transfer the image square by square.
In this case I use charcoal for the sketch, then spray it with retouch varnish before painting.
Computer Screen as Light Box for watercolors.
If you have a photo on your computer screen that you need to transfer, just place your watercolour paper over it and trace. Do this in a darkened room. It works like a light box. You can enlarge your image and do it in sections if it is bigger than the screen.


